


1.1 Activity是什么?
Activity是用户与程序的窗口,使用前需要在清单文件中通过Actvity标签的android:name属性声明,Activity清单文件的属性配置可以参考官方说明。
1.2 典型状态下Activity的生命周期

1.3 正常情况下的生命周期分析
启动Activity:onCreate –> onStart –> onResume
按下Home键:onPause –> onStop 重新进入Activity :onRestart –> onStart –> onResume
按下Back键:onPause –> onStop –> onDestroy 用户在重写onBackPress方法时候注意最终退出APP的时候最好还是调用super.onBackPress方法(官方推荐)。
关于onPause状态:Dialog弹出并不会调用该方法,onPause方法只有在Activity离开栈顶才会被调用。常见会出现只调用onPause而不调用onStop方法的两种情形:
- 第二个Activity的主题为Dialog主题
android:theme="@android:style/Theme.Dialog" - 第二个Activity主题为透明状态
android:theme="@android:style/Theme.Translucent"
1.4 异常情况下Activity的生命周期&数据如何恢复和保存
异常情况下Activity会调用onSaveInstanceState保存当前状态,然后调用onDestory方法。再重新打开异常关闭的Activity,会调用onRestoreInstanceState方法恢复之前保存的状态。大部分View中都有重写这两个方法,无需用户重写保存状态。
1.5 Activity的启动模式及使用场景
android:launchMode 共有四种模式,它们与代码中Intent中addFlag方法的标志位协同工作,确定Activity以何种方式启动。这些模式是:standard、singleTop、singleTask 和 singleInstance。
| 启动模式 | 多个实例? | 注释 |
|---|---|---|
| standard | 是 | 默认。系统时钟会在目标任务中创建新的Activity实 例,并向其传送Intent。 |
| singleTop | 视情况而定 | 如果目标任务的顶部已存在Activity实例,则系统会通 过该实例的onNewIntent()方法向其传送intent,而非<br>创建新的Activity实例。 |
| singleTask | 否 | 系统会在新任务的跟位置创建Activity并向其传送 Intent。不过,如果已存在Activity实例,则系统会调 用该实例的onNewintent()方法。 |
| singleInstance | 否 | 与“singleTask”相同,只是系统不会将任何其他 activity 启动到包含实例的任务中。该Activity始终是 其任务中的唯一Activity。 |
三个启动标志位(Using Intent flags):
FLAG_ACTIVITY_NEW_TASK:与在清单文件中指定的 android:launchMode = "singleTask"行为一致/
FLAG_ACTIVITY_SINGLE_TOP:与在清单文件中指定的 android:launchMode = "singleTop"行为一致。
FLAG_ACTIVITY_CLEAR_TOP:清楚任务栈中目标Activity上面的所有Activity。如果目标Activity的启动模式为Standard,也会将其删除并创建新的实例。因为standard模式始终创建新的实例。
1.6 Activity通信方式
Activity之间通信方式:
两个Activity之间的跳转是通过Intent来实现,携带数据可以通过Intent#putExtra(String,String)方法实现
1 | val intent = Intent(this,SecondActivity::class.java).apply{ |
以Bundle的方式,Google推荐以Bundle的方式传递数据,Bundle对数据的编码解码进行了高度的优化
1 | val bundle = Bundle().apply { |
Activity和Fragment之间通信方式
Activity –> Fragment通信
通过setArgument(Bundle bundle)和getArgument方法实现。
Fragment –> Activity通信,推荐回调的方式实现:
1 | public class FragmentA : ListFragment() { |
宿主Activity需实现 OnArticleSelectedListener 接口,如未实现,运行时会直接报ClassCastException异常
1.7 Activity的显示启动和隐式启动
显示启动这里不做过多介绍,这里讲一下几种隐式启动的常见使用场景:
一、分享相关
1 | <!--提供外部APP可以调用的分享界面--> |
在另一个APP中我们可以直接使用以下代码来调用该界面:
1 | val sendIntent = Intent().apply { |
隐式启动主要通过Intent Fliter,应用过滤器来实现。
二、通过链接打开APP(官网地址)
Android应用链接是指将用户直接转到Android应用内特定内容的HTTP网址。要添加对Android应用链接的支持,请执行以下操作:
- 在清单中创建 Intent 过滤器。
- 将代码添加到应用的Activity中处理传入链接
- 使用Digital Asset Links 将应用与网站相关联
可以直接在清单文件中编辑,也可以通过 Tools > App Links Assistant > Open URL Mapping Editor 来编辑,如下所示:
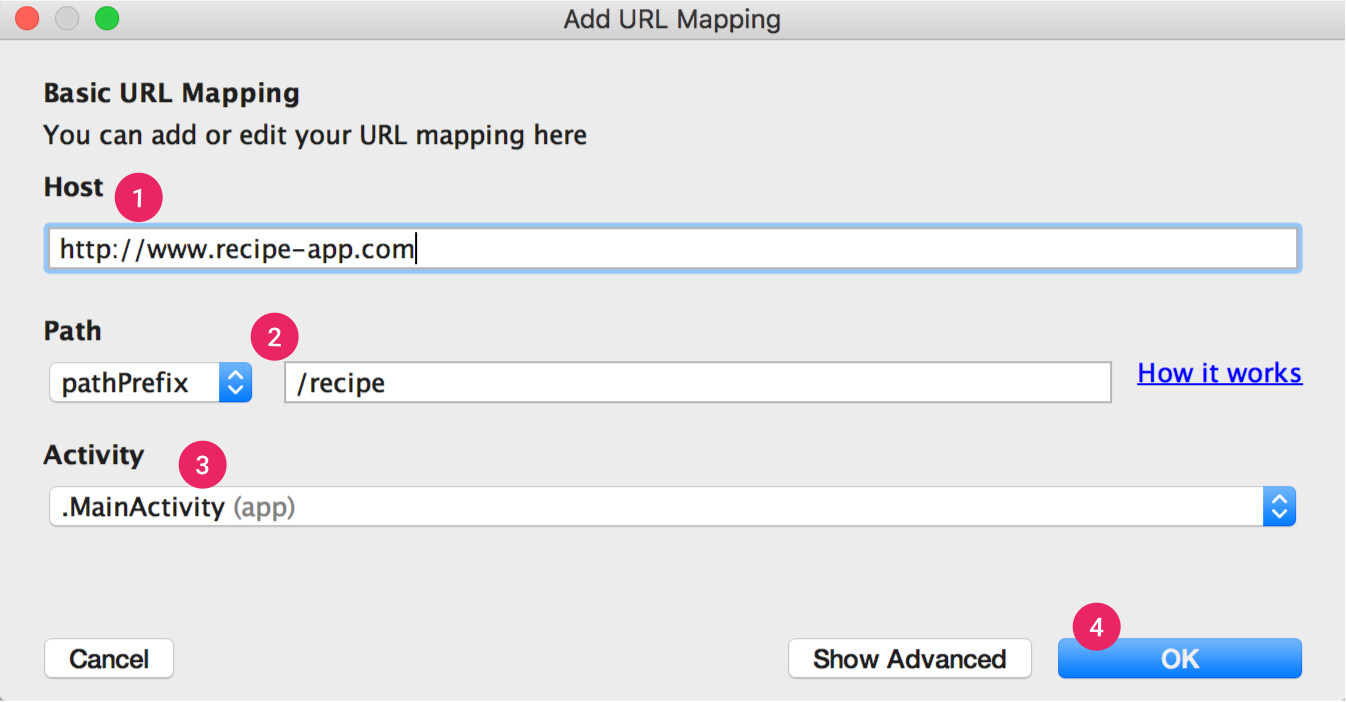
1⃣️ Host 为输入的地址这里面是包含android:scheme="http" 和 android:host="www.recipe-app.com "两种属性的。
2⃣️ Path 主要分为 path、pathPrefix、pathPattern三个选项。区别是path是指定只有当前目录可以访问,pathPrefix是当前目录及当前目录的子目录都可以访问,pathPattern是匹配当前约束条件的都可以访问。
3⃣️ Activity 指定链接指向的Activity。
点击OK之后App Links Assistant 会根据您映射到 AndroidManifest.xml 文件的网址添加 Intent 过滤器:
1 | <intent-filter> |
如何验证URL地址可以指向我们APP的特定APP?可以通过 Test App Link 选项来验证URL链接是否有效。
如何处理根据URL地址来让APP显示特定内容,即处理链接跳转的响应事件
1 | override fun onCreate(savedInstanceState: Bundle?) { |
除此之外如果URL地址中携带参数,例如 scheme://host:port/pathPrefix?key=value 可以通过 intent.data.getQueryParameter(key) 来获取参数value。
将应用与网站相关联
打开 App Link Assistant 中的 Open Digital Links File Genenrator ,然后按照以下步骤操作:
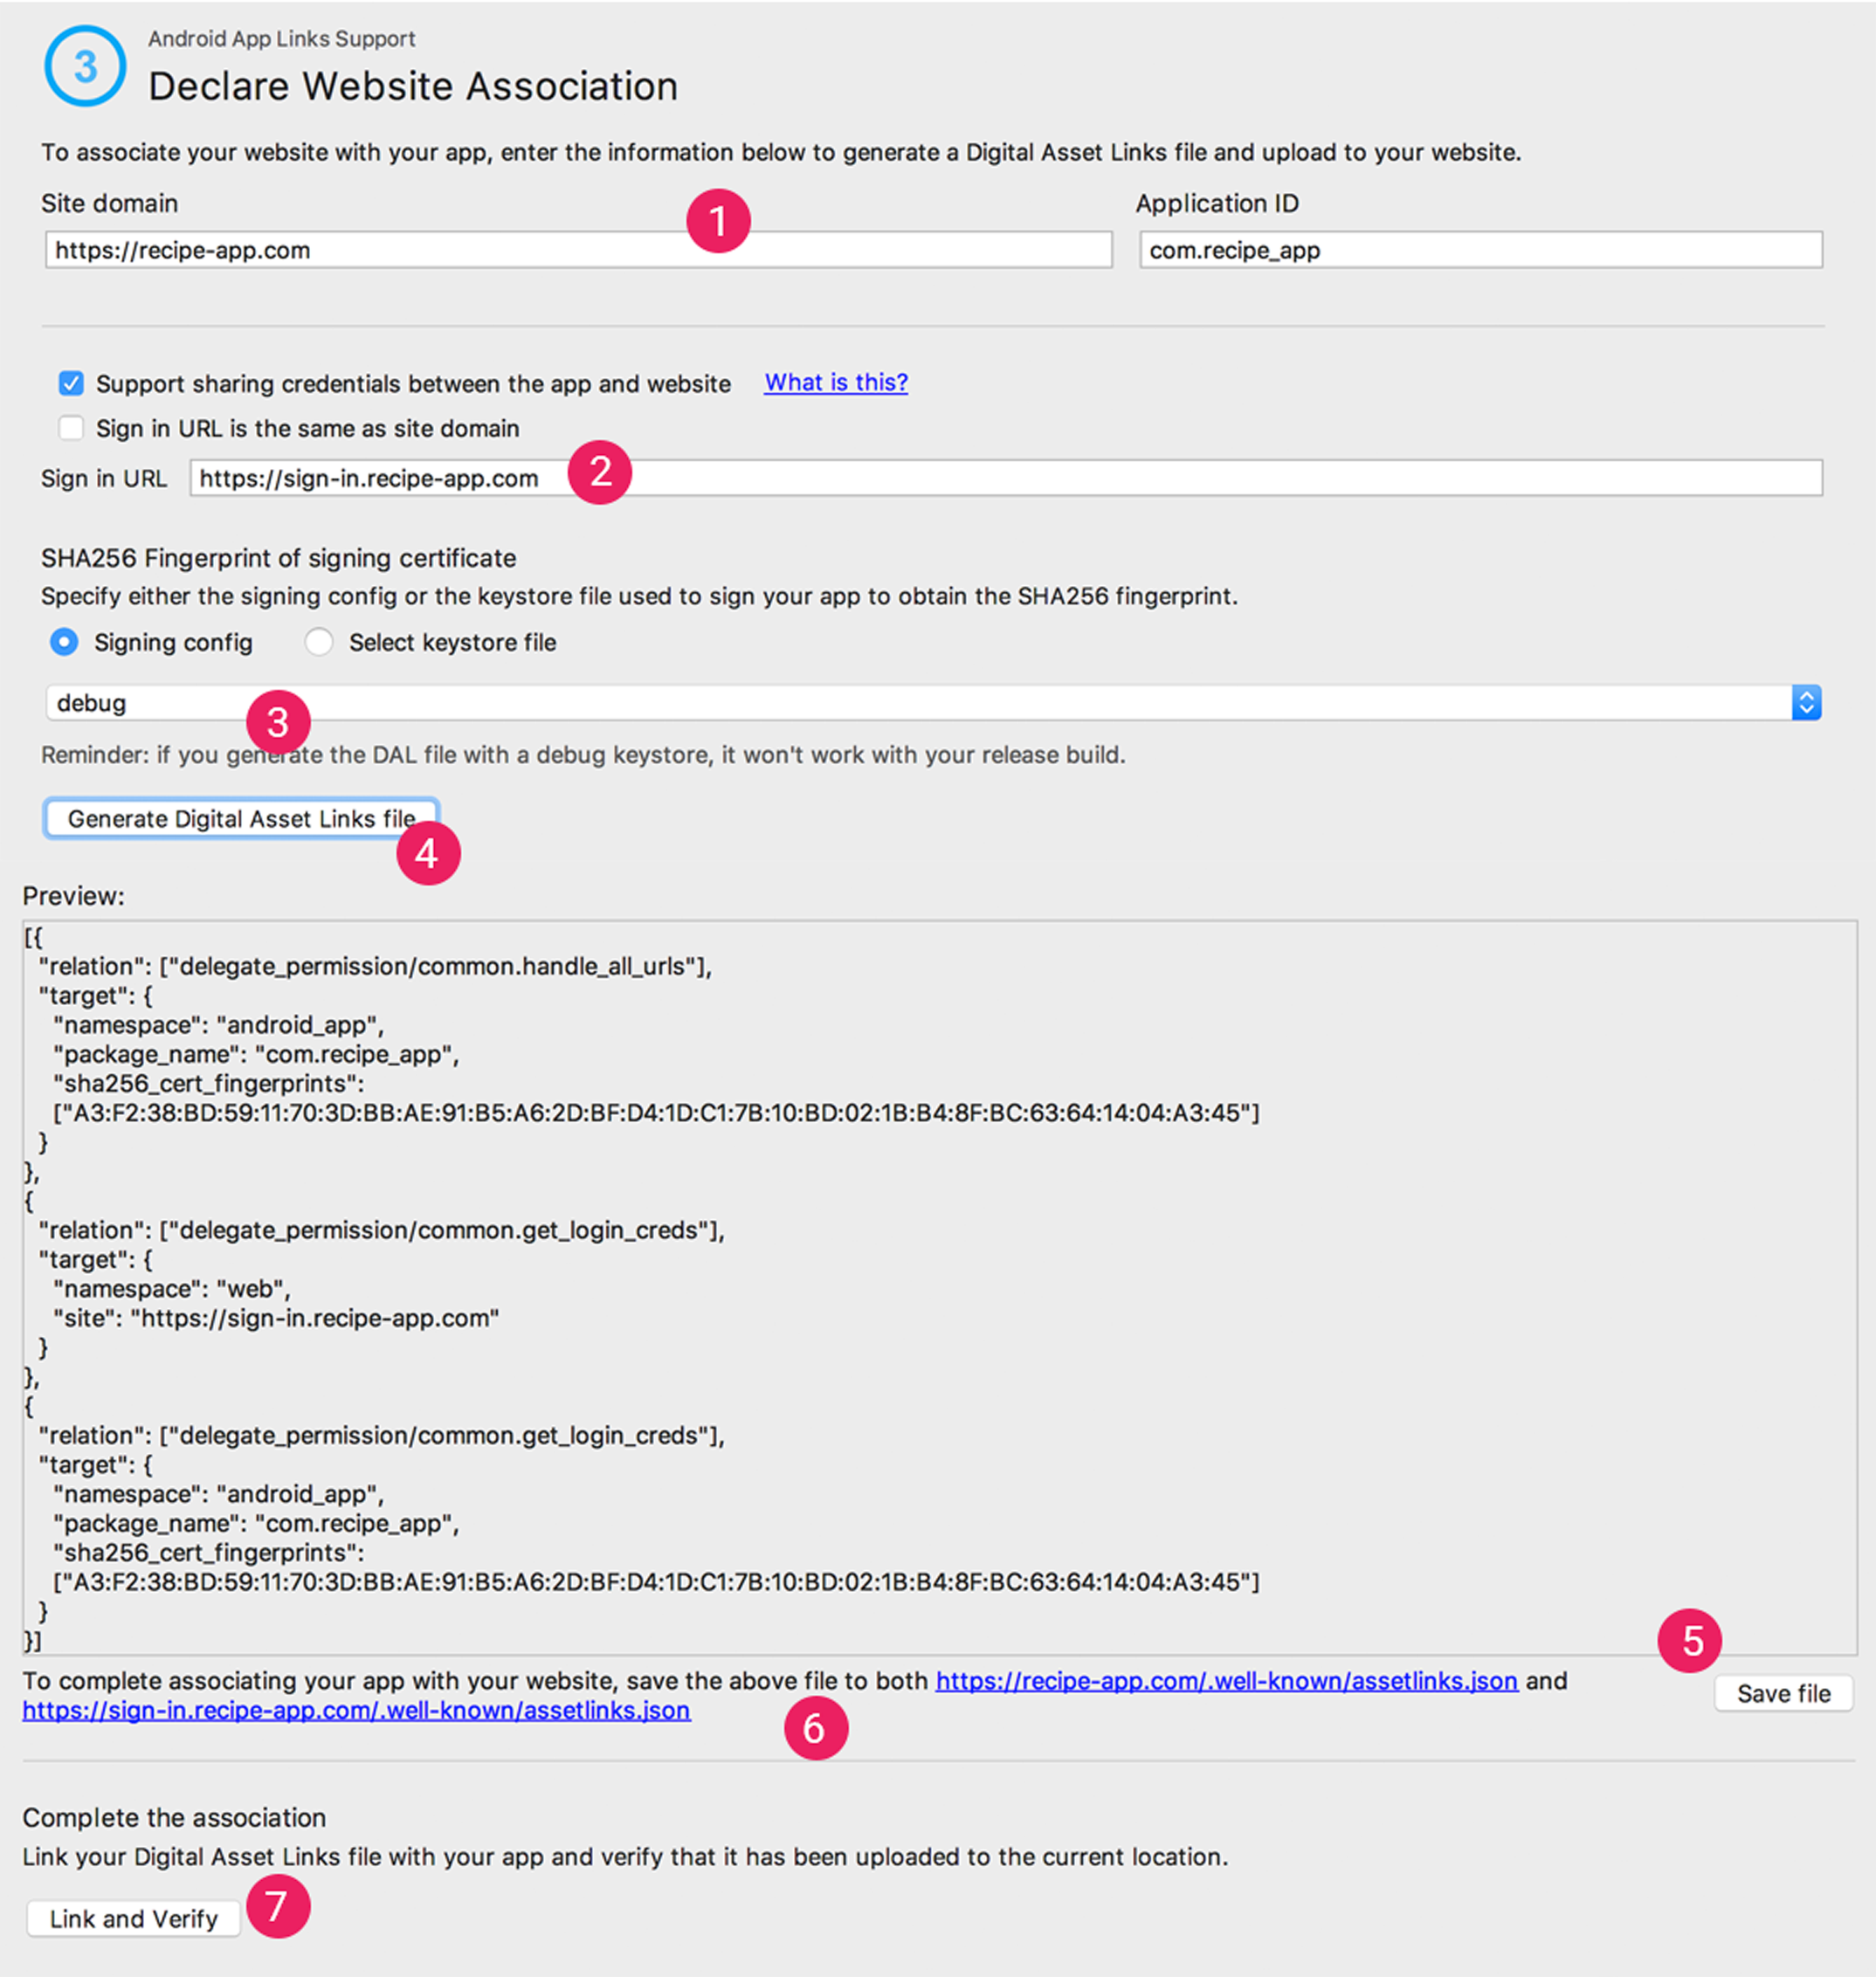
输入您的 Site domain 和 Application ID。
要在 Digital Asset Links 文件中添加 Smart Lock(密码专用)支持,请选择 Support sharing credentials between the app and the website,然后输入网站的登录网址。此操作会将以下字符串添加到声明应用和网站共享登录凭据的 Digital Asset Links 文件中:
delegate_permission/common.get_login_creds。详细了解如何在应用中支持 Smart Lock(密码专用)。指定签名配置或选择密钥库文件。请确保为应用的发布版或调试版选择正确的配置或密钥库文件。如果要设置正式版,请使用版本配置。如果要测试版本,请使用调试配置。
点击 Generate Digital Asset Links file。
Android Studio 生成文件后,点击 Save file 进行下载。
将
assetlinks.json文件上传到您的网站并允许所有人读取,网址为https://<yoursite>/.well-known/assetlinks.json。重要提示:系统会通过加密的 HTTPS 协议验证 Digital Asset Links 文件。请确保无论应用的 Intent 过滤器是否包括
https,均可通过 HTTPS 连接访问assetlinks.json文件。点击 Link and Verify 以确认您已将正确的 Digital Asset Links 文件上传到适当的位置。